ECE 4750 Section 11: Lab 4 Head Start
- Author: Christopher Batten
- Date: November 11, 2022
Table of Contents
- TinyRV2 Single-Core Processor Walk-Through
- Natively Compiling a C Test Programs
- Cross-Compiling Compiling a C Test Programs
- Compiling and Cross-Compiling a C Microbenchmark
- Evaluating a C Microbenchmark
- An Accumulate C Microbenchmark
This discussion section serves to introduce students to the process we
will be using to compile, cross-compile, test, and evaluate C programs
running on the single- and multi-core processors we will be building in
Lab 4. You should log into the ecelinux servers using the remote access
option of your choice and then source the setup script.
% source setup-ece4750.sh
% mkdir -p $HOME/ece4750
% cd $HOME/ece4750
% git clone git@github.com:cornell-ece4750/ece4750-sec11-sys sec11
% cd sec11
% TOPDIR=$PWD
TinyRV2 Single-Core Processor Walk-Through
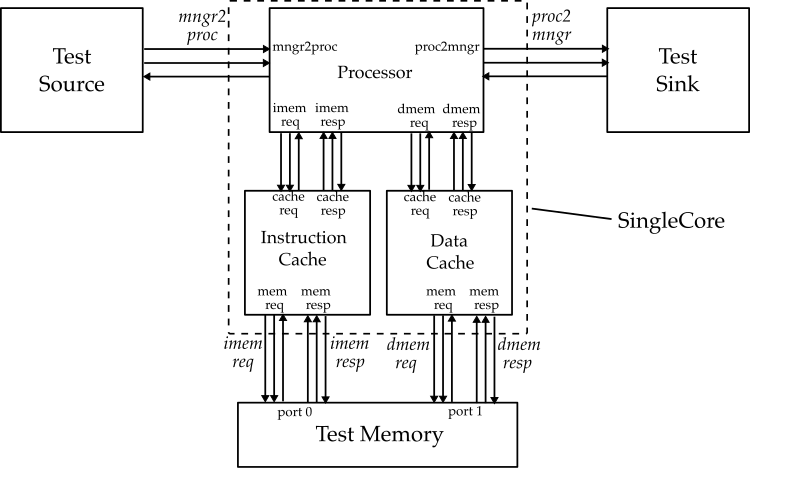
The following figure shows the high-level interface for our TinyRV2 single-core system. We compose the pipelined processor implemented in Lab 2 (which includes the multiplier from Lab 1) with two instances of the cache implemented in Lab 3 to serve as the instruction cache and data cache. There are also mngr2proc and proc2mngr stream interfaces for testing purposes. All interfaces are implemented using the latency-insensitive val/rdy micro-protocol.
Natively Compiling a C Test Program
In Lab 2, you used hand-coded assembly programs to evaluate your pipelined processor. Obviously this is quite tedious and error prone. In Lab 4, you will be writing C programs and cross-compiling them to run on your single-core and multi-core systems.
IMPORTANT: It is absolutely critical that you thoroughly test all of your C programs by natively compiling and executing them before even thinking of executing these programs on your single-core or multi-core system!
When we say “natively compiling and executing” what we mean is that you
have tested your program by compiling it on ecelinux for x86 and then
executed this program on the ecelinux server (i.e., just like any
regular C program). Why is this so important? Because trying to debug an
error in your C program when executing the C program on a simulator is
very painful. It is much easier (and faster!) to debug your C program
using native execution.
Let’s try compiling a C program from the command line. First enter the
following simple C program into a file named hello.c:
#include <stdio.h>

int main( void )
{
  printf("hello world!");
}
Then you can compile and execute this program like this:
% gcc -o hello hello.c
% ./hello
We are using gcc as the native compiler. Manually compiling programs
from the command line like this is tedious and error prone. We can
automate this process using a build system. More specifically, we will
be using a Makefile to automate the process of compiling,
cross-compiling, linking, and executing C programs. The build system and
all of the C source code for Lab 4 will be in the app subdirectory;
let’s take a look at this subdirectory:
% cd $TOPDIR/app
% tree
.
├── aclocal.m4
├── config.h.in
├── configure
├── configure.ac
├── ece4750
│   ├── crt0.S
│   ├── ece4750.ac
│   ├── ece4750-check.c
│   ├── ece4750-check.h
│   ├── ece4750-check-test.c
│   ├── ece4750.h
│   ├── ece4750-malloc.c
│   ├── ece4750-malloc.h
│   ├── ece4750-malloc-test.c
│   ├── ece4750-misc.c
│   ├── ece4750-misc.h
│   ├── ece4750.mk.in
│   ├── ece4750-wprint.c
│   ├── ece4750-wprint-ex.c
│   └── ece4750-wprint.h
├── Makefile.in
├── scripts
│   ├── config.guess
│   ├── config.sub
│   ├── gen-unsorted-list.py
│   ├── install.sh
│   ├── mk-install-dirs.sh
│   ├── tinyrv2.ld
│   └── vcs-version.sh
├── simple
│   ├── simple.ac
│   ├── simple-avg-adhoc.c
│   ├── simple-avg.c
│   ├── simple-avg.h
│   ├── simple-avg-test.c
│   └── simple.mk.in
└── ubmark
    ├── ubmark.ac
    ├── ubmark.mk.in
    ├── ubmark-vvadd.c
    ├── ubmark-vvadd.dat
    ├── ubmark-vvadd-eval.c
    ├── ubmark-vvadd.h
    └── ubmark-vvadd-test.c
In this discussion section, we will be starting with the code in
app/simple and also take a quick look at the code in app/ubmark. We
provide a very simple ece4750 standard C library in app/ece4750 which
enables printing, dynamic memory allocation, pseudo random number
generation, exiting the program, and unit testing. Remember that our
systems do not run an operating system. You cannot use the “real”
standard C library, read/write files, process complex command line
arguments, etc. We can only write simple “bare-metal” C programs.
Let’s take a look at the simple C program in
app/simple/simple-avg-adhoc.c with a function that averages two
integers:
#include "ece4750.h"

__attribute__ ((noinline))
int avg( int x, int y )
{
  int sum = x + y;
  return sum / 2;
}

int main( void )
{
  int a = 10;
  int b = 20;
  int c = avg( a, b );

  ece4750_wprintf( L"average of %d and %d is %d\n", a, b, c );

  return 0;
}
First, notice how we include the ece4750.h header which gives us access
to the very simple ece4750 standard C library. We are using a noinline
attribute to prevent the C compiler from inlining this function; this
makes it easier for us to see the assembly corresponding to this
function. Notice how we are using ece4750_wprintf instead of printf.
This is because printf uses regular ASCII character strings which are
stored as arrays of bytes. If we try to read/write a regular ASCII
character string this will result in byte load/stores but TinyRV2 only
supports 4B word load/stores! So we will instead always use “wide
characters” which is stored as a 4B word. You will need to use the L
prefix in front of all string literals. You can always look in the
ece4750 standard library to learn more about how these functions are
implemented.
Let’s use the build system to compile this simple C program. We always start by creating a build directory, just like we do when testing and evaluating our RTL models. We want to keep generated files separate from source files.
% mkdir -p $TOPDIR/app/build-native
% cd $TOPDIR/app/build-native
% ../configure
We name the build directory build-native to clearly indicate that this
is where we will be doing native compilation. The configure script uses
the app/Makefile.in template to create a specialized Makefile for
this build. Now we can go ahead and compile the simple C program.
% cd $TOPDIR/app/build-native
% make simple-avg-adhoc
% objdump -dC ./simple-avg-adhoc
You can see from objdump that this is an x86 binary (not a TinyRV2
binary!). Now let’s execute the program.
% cd $TOPDIR/app/build-native
% ./simple-avg-adhoc
Hopefully no surprises. This simple C program is an example of “ad-hoc testing”. We write a program, try some inputs, and print the outputs. We can manually verify that the outputs are correct. We argued previously in the semester that ad-hoc testing is insufficient for hardware, and all those same reasons apply to software. We must use a systematic and automatic unit testing strategy to verify that our software is correct. We provide you a simple unit testing framework to make this relatively easy.
First, you will need to keep the function under test in a separate file.
This way we can use modular compilation to compile the function and link
it against our test program and then later link it against an evaluation
program for final performance analysis. Take a look at the
app/simple/simple-avg.h and app/simple/simple-avg.c files; the header
file contains the function declaration (i.e., the interface for the
function) and the C source file contains the function definition (i.e.,
the implementation for the function). Now let’s look at the test program
in app/simple/simple-avg-test.c:
#include "ece4750.h"
#include "simple-avg.h"

void test_case_1_pos_pos_even()
{
  ECE4750_CHECK( L"test_case_1_pos_pos_even" );

  ECE4750_CHECK_INT_EQ( avg(   4,   8 ),   6 );
  ECE4750_CHECK_INT_EQ( avg( 100, 200 ), 150 );
  ECE4750_CHECK_INT_EQ( avg(  37,  53 ),  45 );
}

...

int main( int argc, char** argv )
{
  __n = ( argc == 1 ) ? 0 : ece4750_atoi( argv[1] );

  if ( (__n <= 0) || (__n == 1) ) test_case_1_pos_pos_even();
  if ( (__n <= 0) || (__n == 2) ) test_case_2_pos_pos_odd();
  if ( (__n <= 0) || (__n == 3) ) test_case_3_neg_neg_even();
  if ( (__n <= 0) || (__n == 4) ) test_case_4_neg_neg_odd();
  if ( (__n <= 0) || (__n == 5) ) test_case_5_pos_neg_even();
  if ( (__n <= 0) || (__n == 6) ) test_case_6_pos_neg_odd();

  ece4750_wprintf( L"\n\n" );
  return ece4750_check_status;
}
Each test case is a separate function. You should use the ECE4750_CHECK
macro with a string which indicates the name of this test case. Then you
can use additional ECE4750_CHECK macros to check various properties of
your C program.
ECE4750_CHECK_FAIL: force a test case failureECE4750_CHECK_TRUE: check if an expression is trueECE4750_CHECK_FALSE: check if an expression is falseECE4750_CHECK_INT_EQ: check if two expressions are equal
You need to make sure to modify the main function to call each test
case using the pattern shown above. Let’s compile and run this test
program:
% cd $TOPDIR/app/build-native
% make simple-avg-test
% ./simple-avg-test -1
% ./simple-avg-test
% ./simple-avg-test 1
The test program takes a single integer command line argument. -1 means
to print the name of each test case but not to actually run the test
cases. With no command line argument, the test program will run all of
the tests. You can also specify a single test case number to run on the
command line. A little green dot indicates that one of the
ECE4750_CHECK macros passed. It is very convenient to build and run a
unit test with a single command like this:
% cd $TOPDIR/app/build-native
% make simple-avg-test && ./simple-avg-test
This way you can rerun the test by just pressing the up arrow key and enter. You can run all of the test cases associated with a specific subproject like this:
% cd $TOPDIR/app/build-native
% make check-simple
And you can run all of the test cases across all subprojects like this:
% cd $TOPDIR/app/build-native
% make check
Cross-Compiling Compiling a C Test Program
Now that we know our simple C program works natively, we can try
cross-compiling it and executing it on our simulators. Let’s go back to
our hello.c program:
#include <stdio.h>

int main( void )
{
  printf("hello world!");
}
We can cross-compile this program like this:
% riscv32-unknown-elf-gcc -o hello hello.c
% ./hello
Instead of using gcc, which is the native compiler, we are using
riscv32-unknown-elf-gcc which is the cross-compiler for RISC-V. Note
that this a general cross-compiler that supports the full RISC-V
instruction set. You can definitely compile complex programs that will
not work on a TinyRV2 simulator. For example, the above program will not
work on a TinyRV2 simulator because it uses printf and ASCII character
strings which are not supported.
Let’s move to doing cross-compilation using the build system.
Cross-compilation needs its own build directory separate from the build
directory we use for native compilation. We also need to give the
configure script a special command line option.
% mkdir -p $TOPDIR/app/build
% cd $TOPDIR/app/build
% ../configure --host=riscv32-unknown-elf
Now let’s cross-compile simple-avg-adhoc. The Makefile takes care of
using riscv32-unknown-elf-gcc.
% cd $TOPDIR/app/build
% make simple-avg-adhoc
% riscv32-objdump ./simple-avg-adhoc | less -p "<avg>:"
...
00000254 <avg>:
  254: add   x10, x10, x11
  258: srli  x15, x10, 0x1f
  25c: add   x5,  x15, x10
  260: srai  x10, x5,  0x1
  264: jalr  x0,  x1,  0
You can see it has compiled the avg function into five RISC-V
instructions. The division is implemented using a SRAI instruction. The
SRLI instruction and second ADD instruction make sure that integer
division rounds towards zero when averaging negative numbers. The are two
more key parts of the cross-compilation process.
First, the linker script is used to specify how different parts of the program are placed into the virtual address space. We usually use the default linker script, but for TinyRV2 we need to be very careful where we put the code to make sure it starts at the reset vector (i.e., address 0x200). If you are interested, you can see the TinyRV2 linker script here:
% cd $TOPDIR/app/scripts
% cat tinyrv2.ld
Second, the crt0.S assembly file is used to specify the assembly
instructions which should be executed when starting the program. We don’t
start the program by executing main. We start by doing some setup code,
and then that setup code will call main. We usually use the default
crt0.S, but for TinyRV2 we need our own custom crt0.S. If you are
interested, you can see the TinyRV2 crt0.S assembly file here:
% cd $TOPDIR/app/ece4750
% cat crt0.S
Now we are ready to execute our cross-compiled program on our simulators.
You should always start by executing the program on a functional-level
model of the target system (also called an instruction set architecture
(ISA) simulator). This way we know the program has been cross-compiled
correctly before we try executing the program on our detailed RTL models.
We provide an ISA simulator for you in Lab 4 in sim/lab4_sys/sys-sim.
So you can run the cross-compiled program like this:
% cd $TOPDIR/app/build
% ../../sim/lab4_sys/sys-sim ./simple-avg-adhoc
To simplify using the system simulator, you can also temporarily add it to your path like this:
% export PATH="$TOPDIR/sim/lab4_sys:$PATH"
% cd $TOPDIR/app/build
% sys-sim ./simple-avg-adhoc
If our simulators do not support an operating system, how is the program
able to print to the console? If you look in
app/ece4750/ece4750-wprint.h and app/ece4750/ece4750-wprint.c you
will see that calling ece4750_wprintf eventually results in sending
messages to the test harness using the proc2mngr CSR. The system
simulator looks for these messages and knows how to display integers,
characters, and strings to the console.
Let’s now cross-compile and run our test program on the TinyRV2 ISA simulator.
% cd $TOPDIR/app/build
% make simple-avg-test
% sys-sim ./simple-avg-test -1
% sys-sim ./simple-avg-test
% sys-sim ./simple-avg-test 1
This will run all of our software tests on the TinyRV2 ISA simulator which gives us confidence that our program has been cross-compiled correctly (we already know our program works since we tested in natively!). Notice how you can pass command line arguments to the cross-compiled program running on the ISA simulator. Again, it is very convenient to build and run a unit test with a single command like this:
% cd $TOPDIR/app/build
% make simple-avg-test && ./simple-avg-test
You can run all of the test cases associated with a specific subproject like this:
% cd $TOPDIR/app/build
% make check-simple
And you can run all of the test cases across all subprojects like this:
% cd $TOPDIR/app/build
% make check
Compiling and Cross-Compiling a C Microbenchmark
Obviously, we want to explore more interesting programs than an integer
average function. Let’s look at our element-wise vector-vector addition
microbenchmark. All of our single-core microbenchmarks will be in the
app/ubmark directory. Take a look at the implementation of the
benchmark in app/ubmark/ubmark-vvadd.h and app/ubmark/ubmark-vvadd.c.
Then look at the unit tests in app/ubmark/ubmark-vvadd-test.c. We have
tests for positive values, negative values, and different sized input
arrays.
Let’s start by testing this microbenchmark natively.
% cd $TOPDIR/app/build-native
% make ubmark-vvadd-test
% ./ubmark-vvadd-test
Then we can cross-compile the microbenchmark and take a look at the corresponding assembly.
% cd $TOPDIR/app/build
% make ubmark-vvadd-test
% riscv32-objdump ./ubmark-vvadd-test | less -p "<ubmark_vvadd>:"
...
00000ec0 <ubmark_vvadd>:
  ec0: bge   x0,  x13, eec # -----.
  ec4: slli  x13, x13, 0x2 #      |
  ec8: add   x13, x11, x13 #      |
  ecc: lw    x15, 0(x11)   # <-.  |
  ed0: lw    x14, 0(x12)   #   |  |
  ed4: addi  x11, x11, 4   #   |  |
  ed8: addi  x12, x12, 4   #   |  |
  edc: add   x15, x15, x14 #   |  |
  ee0: sw    x15, 0(x10)   #   |  |
  ee4: addi  x10, x10, 4   #   |  |
  ee8: bne   x11, x13, ecc # --'  |
  eec: jalr  x0,  x1,  0   # <----'
We have annoted the assembly to show the control flow. The first BGE instruction branches directly to the function return if the size is less than or equal to zero. The SLLI and ADD create a pointer that points to one past the last element in the array. Then we see the expected loads, add, stores, and pointer bumps. The key difference from the classic loop we study in lecture is that the compiler has elimited the instruction used to decrement the loop counter and is instead simply comparing one of the array pointers to the pre-calculated “one past the last element” pointer.
Now let’s execute this test program on the TinyRV2 ISA simulator:
% cd $TOPDIR/app/build
% sys-sim ./ubmark-vvadd-test
Evaluating a C Microbenchmark
Now that we know our microbenchmark passes all of our tests natively and
on the ISA simulator, we are ready to do an actual evaluation. Take a
look at the evaluation program in app/ubmark/ubmark-vvadd-eval.c:
#include "ece4750.h"
#include "ubmark-vvadd.h"
#include "ubmark-vvadd.dat"

int main( void )
{
  // Allocate destination array for results

  int* dest = ece4750_malloc( eval_size * (int)sizeof(int) );

  // Run the evaluation

  ece4750_stats_on();
  ubmark_vvadd( dest, eval_src0, eval_src1, eval_size );
  ece4750_stats_off();

  // Verify the results

  for ( int i = 0; i < eval_size; i++ ) {
    if ( dest[i] != eval_ref[i] ) {
      ece4750_wprintf( L"\n FAILED: dest[%d] != eval_ref[%d] (%d != %d)\n\n",
                       i, i, dest[i], eval_ref[i] );
      ece4750_exit(1);
    }
  }

  ece4750_wprintf( L"\n **PASSED** \n\n" );

  // Free destination array

  ece4750_free(dest);

  return 0;
}
A couple of things to note. The dataset is stored in ubmark-vvadd.dat.
We cannot read/write files, so all datasets will be compiled into the
binary using global arrays. The .dat file also includes the reference
output so we can verify the microbenchmark has produced the correct
result. We are using ece4750_malloc to do dynamic memory allocation. We
are using a very, very simple bump allocator which just allocates dynamic
memory on the heap but never really frees it. Do not try to allocate too
much dynamic memory! Finally, notice how we call ece4750_stats_on right
before the function we want to evaluate and ece4750_stats_off right
after the function we want to evaluate. These functions write a CSR which
then triggers a signal in the simulator to start or stop collecting
statistics. We call this region the region of interest (ROI).
As always, we need to make sure our evaluation program works natively before trying to actually execute it on our simulators.
% cd $TOPDIR/app/build-native
% make ubmark-vvadd-eval
% ./ubmark-vvadd-eval
Once we know the microbenchmark works, we can cross-compile it and run it on our ISA simulator.
% cd $TOPDIR/app/build
% make ubmark-vvadd-eval
% sys-sim ./ubmark-vvadd-eval
We can use the --stats command line option to display statistics.
% cd $TOPDIR/app/build
% sys-sim --stats ./ubmark-vvadd-eval
Since this is an ISA simulator the number of cycles is not meaningful, but the number of instructions is useful since it tells you how many instructions are in the ROI.
Of course, the real goal is to run this microbenchmark on our RTL models. You will be creating a single-core system in Lab 4, but just for demonstration purposes, we can show how to do evaluate this microbenchmark on our single-core system. You should start by confirming your test program runs correctly on the RTL model of the single-core system like this:
% cd $TOPDIR/app/build
% sys-sim --impl base ./ubmark-vvadd-test
Then you can run the evaluation program on the single-core system. Here is what it looks like on our single-core system.
% cd $TOPDIR/app/build
% sys-sim --impl base --stats ./ubmark-vvadd-eval

  num_cycles        = 4258
  num_inst          = 811
  CPI               = 5.25

  num_icache_access = 912
  num_icache_miss   = 5
  icache_miss_rate  = 0.01

  num_dcache_access = 301
  num_dcache_miss   = 75
  dcache_miss_rate  = 0.25
There are 811 instructions in the ROI and the CPI is 5.25. The instruction cache miss rate is quite low since there is significant temporal locality in the vector-vector-add loop. The data cache miss rate is 25% which is to be expected. This microbenchmark is streaming through three arrays. The access to the first word on a cache line results in a miss, and then we have four hits when accessing the next four words. There are three arrays each with 100 elements, so the number of data cache accesses is around 300. There is one extra data cache access due to a few extra instructions before/after the key inner loop. We can look at the line trace to learn more about the execution of this microbenchmark.
% cd $TOPDIR/app/build
% sys-sim --impl base --trace ./ubmark-vvadd-eval > trace.txt
For long traces it is often better to save them to a file. You can search
for csrw to jump to where stats are enabled (i.e. the ROI). It can be a
little complicated to analyze the line trace since the loop has been
unrolled and aggressively optimized. This is what the line trace looks
like for an iteration of the loop where the memory accesses miss in the
data cache.
      F-stage  D-stage                 X    M    W     icache     dcache     imem  dmem
497: *#       |                       |    |    |    |(I   [...])(I   [...])      |       # icache request
498: *#       |                       |    |    |    |(TC h[...])(I   [...])      |       # icache hit!
499: *#       |                       |    |    |    |(RD  [...])(I   [...])      |       # icache read data
500: *00000260|                       |    |    |    |(W   [...])(I   [...])      |       # LW F-stage, icache response
501: *#       |lw     x15, 0x000(x11) |    |    |    |(I   [...])(I   [...])      |       # LW D-stage
502: *#       |                       |lw  |    |    |(TC h[...])(I   [...])      |       # LW X-stage, dcache request
503: *#       |                       |    |#   |    |(RD  [...])(TC m[...])      |       # dcache miss!
504: *#       |                       |    |#   |    |(W   [...])(RR  [...])      |rd>    # dcache refill
505: *#       |                       |    |#   |    |(W   [...])(RW  [...])      |  >rd  # dcache refill
506: *#       |                       |    |#   |    |(W   [...])(RU  [...])      |       # dcache refill
507: *#       |                       |    |#   |    |(W   [...])(RD  [...])      |       # dcache read data
508: *00000264|                       |    |lw  |    |(W   [...])(W   [...])      |       # LW M-stage, dcache response
509: *#       |lw     x14, 0x000(x12) |    |    |lw  |(I   [...])(I   [...])      |       # LW W-stage
510: *#       |                       |lw  |    |    |(TC h[...])(I   [...])      |
511: *#       |                       |    |#   |    |(RD  [...])(TC m[...])      |
512: *#       |                       |    |#   |    |(W   [...])(RR  [...])      |rd>
513: *#       |                       |    |#   |    |(W   [...])(RW  [...])      |  >rd
514: *#       |                       |    |#   |    |(W   [...])(RU  [...])      |
515: *#       |                       |    |#   |    |(W   [...])(RD  [...])      |
516: *00000268|                       |    |lw  |    |(W   [...])(W   [...])      |
517: *#       |addi   x11, x11, 0x004 |    |    |lw  |(I   [...])(I   [...])      |
518: *#       |                       |addi|    |    |(TC h[...])(I   [...])      |
519: *#       |                       |    |addi|    |(RD  [...])(I   [...])      |
520: *0000026c|                       |    |    |addi|(W   [...])(I   [...])      |
521: *#       |addi   x12, x12, 0x004 |    |    |    |(I   [...])(I   [...])      |
522: *#       |                       |addi|    |    |(TC h[...])(I   [...])      |
523: *#       |                       |    |addi|    |(RD  [...])(I   [...])      |
524: *00000270|                       |    |    |addi|(W   [...])(I   [...])      |
525: *#       |add    x15, x15, x14   |    |    |    |(I   [...])(I   [...])      |
526: *#       |                       |add |    |    |(TC h[...])(I   [...])      |
527: *#       |                       |    |add |    |(RD  [...])(I   [...])      |
528: *00000274|                       |    |    |add |(W   [...])(I   [...])      |
529: *#       |sw     x15, 0x000(x10) |    |    |    |(I   [...])(I   [...])      |
530: *#       |                       |sw  |    |    |(TC h[...])(I   [...])      |
531: *#       |                       |    |#   |    |(RD  [...])(TC m[...])      |
532: *#       |                       |    |#   |    |(W   [...])(RR  [...])      |rd>
533: *#       |                       |    |#   |    |(W   [...])(RW  [...])      |  >rd
534: *#       |                       |    |#   |    |(W   [...])(RU  [...])      |
535: *#       |                       |    |#   |    |(W   [...])(WR  [...])      |
536: *00000278|                       |    |sw  |    |(W   [...])(W   [...])      |
537: *#       |addi   x10, x10, 0x004 |    |    |sw  |(I   [...])(I   [...])      |
538: *#       |                       |addi|    |    |(TC h[...])(I   [...])      |
539: *#       |                       |    |addi|    |(RD  [...])(I   [...])      |
540: *0000027c|                       |    |    |addi|(W   [...])(I   [...])      |       #
541: *#       |bne    x11, x13, 0x1fe4|    |    |    |(I   [...])(I   [...])      |       #
542: *~       |                       |bne |    |    |(TC h[...])(I   [...])      |       # BNE X-stage, branch taken
543: *#       |                       |    |bne |    |(RD  [...])(I   [...])      |       # wait for in-flight icache req
544: *#       |                       |    |    |bne |(W   [...])(I   [...])      |       # wait for in-flight icache req
545: *#       |                       |    |    |    |(I   [...])(I   [...])      |       # fetch branch target
546: *#       |                       |    |    |    |(TC h[...])(I   [...])      |
547: *#       |                       |    |    |    |(RD  [...])(I   [...])      |
548: *00000260|                       |    |    |    |(W   [...])(I   [...])      |
549: *#       |lw     x15, 0x000(x11) |    |    |    |(I   [...])(I   [...])      |
550: *#       |                       |lw  |    |    |(TC h[...])(I   [...])      |
551: *#       |                       |    |#   |    |(RD  [...])(TC h[...])      |
552: *#       |                       |    |#   |    |(W   [...])(RD  [...])      |
553: *00000264|                       |    |lw  |    |(W   [...])(W   [...])      |
554: *#       |lw     x14, 0x000(x12) |    |    |lw  |(I   [...])(I   [...])      |
The * right before the F stage means that stats are enabled (i.e., we
are in the ROI). The line trace shows the five-stage pipeline as well as
the cache FSMs. We have edited out the tag state. You can see that all
instruction cache accesses are hitting in the cache, but you can clearly
see the impact of the four-cycle hit latency! Each instruction cache
access must go through the I->TC->RD->W states. The instruction cache
access for the first LW goes to the cache on cycle 497 and it is returned
on cycle 500. The processor pipeline is finally able to decode the LW on
cycle 501. The four-cycle hit latency means the absolute lowest CPI will
be 4. On cycle 502, the LW is in the X stage and sends a data memory
request to the data cache. You can see the data cache go through the
I->TC->RR->RW->RU->RD->W states to handle the miss, and you can see the
refill read request go to main memory on cycle 504 and the refill
response coming back on cycle 505. Finally, the data is returned from
memory on cycle 1056. The second LW and the SW also miss. If we count
when the instruction fetch for the first LW is sent to the icache on
cycle 497 to when the same thing happens for the first LW in the next
iteration on cycle 545, the total number of cycles to execute this
iteration of the loop is 48 for a CPI of 48/8 = 6.
This is what the line trace looks like for the next iteration of the loop when the memory accesses hit in the data cache.
      F-stage  D-stage                 X    M    W     icache     dcache     imem  dmem
545: *#       |                       |    |    |    |(I   [...])(I   [...])      |
546: *#       |                       |    |    |    |(TC h[...])(I   [...])      |
547: *#       |                       |    |    |    |(RD  [...])(I   [...])      |
548: *00000260|                       |    |    |    |(W   [...])(I   [...])      |
549: *#       |lw     x15, 0x000(x11) |    |    |    |(I   [...])(I   [...])      |
550: *#       |                       |lw  |    |    |(TC h[...])(I   [...])      |
551: *#       |                       |    |#   |    |(RD  [...])(TC h[...])      |
552: *#       |                       |    |#   |    |(W   [...])(RD  [...])      |
553: *00000264|                       |    |lw  |    |(W   [...])(W   [...])      |
554: *#       |lw     x14, 0x000(x12) |    |    |lw  |(I   [...])(I   [...])      |
555: *#       |                       |lw  |    |    |(TC h[...])(I   [...])      |
556: *#       |                       |    |#   |    |(RD  [...])(TC h[...])      |
557: *#       |                       |    |#   |    |(W   [...])(RD  [...])      |
558: *00000268|                       |    |lw  |    |(W   [...])(W   [...])      |
559: *#       |addi   x11, x11, 0x004 |    |    |lw  |(I   [...])(I   [...])      |
560: *#       |                       |addi|    |    |(TC h[...])(I   [...])      |
561: *#       |                       |    |addi|    |(RD  [...])(I   [...])      |
562: *0000026c|                       |    |    |addi|(W   [...])(I   [...])      |
563: *#       |addi   x12, x12, 0x004 |    |    |    |(I   [...])(I   [...])      |
564: *#       |                       |addi|    |    |(TC h[...])(I   [...])      |
565: *#       |                       |    |addi|    |(RD  [...])(I   [...])      |
566: *00000270|                       |    |    |addi|(W   [...])(I   [...])      |
567: *#       |add    x15, x15, x14   |    |    |    |(I   [...])(I   [...])      |
568: *#       |                       |add |    |    |(TC h[...])(I   [...])      |
569: *#       |                       |    |add |    |(RD  [...])(I   [...])      |
570: *00000274|                       |    |    |add |(W   [...])(I   [...])      |
571: *#       |sw     x15, 0x000(x10) |    |    |    |(I   [...])(I   [...])      |
572: *#       |                       |sw  |    |    |(TC h[...])(I   [...])      |
573: *#       |                       |    |#   |    |(RD  [...])(TC h[...])      |
574: *#       |                       |    |#   |    |(W   [...])(WR  [...])      |
575: *00000278|                       |    |sw  |    |(W   [...])(W   [...])      |
576: *#       |addi   x10, x10, 0x004 |    |    |sw  |(I   [...])(I   [...])      |
577: *#       |                       |addi|    |    |(TC h[...])(I   [...])      |
578: *#       |                       |    |addi|    |(RD  [...])(I   [...])      |
579: *0000027c|                       |    |    |addi|(W   [...])(I   [...])      |
580: *#       |bne    x11, x13, 0x1fe4|    |    |    |(I   [...])(I   [...])      |
581: *~       |                       |bne |    |    |(TC h[...])(I   [...])      |
582: *#       |                       |    |bne |    |(RD  [...])(I   [...])      |
583: *#       |                       |    |    |bne |(W   [...])(I   [...])      |
584: *#       |                       |    |    |    |(I   [...])(I   [...])      |
585: *#       |                       |    |    |    |(TC h[...])(I   [...])      |
586: *#       |                       |    |    |    |(RD  [...])(I   [...])      |
587: *00000260|                       |    |    |    |(W   [...])(I   [...])      |
588: *#       |lw     x15, 0x000(x11) |    |    |    |(I   [...])(I   [...])      |
589: *#       |                       |lw  |    |    |(TC h[...])(I   [...])      |
590: *#       |                       |    |#   |    |(RD  [...])(TC h[...])      |
591: *#       |                       |    |#   |    |(W   [...])(RD  [...])      |
592: *00000264|                       |    |lw  |    |(W   [...])(W   [...])      |
593: *#       |lw     x14, 0x000(x12) |    |    |lw  |(I   [...])(I   [...])      |
Notice that for this sequence, each access to the data cache hits and goes through the I->TC->RD/WR->W states. If we count when the instruction fetch for the first LW is sent to the icache on cycle 545 to when the same thing happens for the first LW in the next iteration on cycle 584, the total number of cycles to execute this iteration of the loop is 39 for a CPI of 39/8 = 4.875.
The arrays in the microbenchmark have a size of 100; 25 of these iterations will miss in the cache and take roughly 48 cycles and 75 of these iterations will hit in the cache and take 39 cycles for a total of 2548+7539 = 4125 cycles. The actual cycle count is 4258 cycles. The difference is because sometimes we need to evict cache lines which increases the miss penalty, and there are some instructions before and after the loop that need to be executed.
An Accumulate C Microbenchmark
Try writing an accumulate microbenchmark in the ubmark-accumulate.c
file. Compile it natively to verify the tests pass and the evaluation
program works like this:
% cd $TOPDIR/app/build-native
% make ubmark-accumulate-test
% ./ubmark-accumulate-test
% make ubmark-accumulate-eval
% ./ubmark-accumulate-eval
Then cross-compile it and look at the disassembly like this:
% cd $TOPDIR/app/build
% make ubmark-accumulate-test
% riscv32-objdump ./ubmark-accumulate-test | less -p "<ubmark_accumulate>:"
Then run those tests on the ISA simulator.
% cd $TOPDIR/app/build
% sys-sim ubmark-accumulate-test
Now try the evaluation program on the ISA simulator.
% cd $TOPDIR/app/build
% sys-sim ubmark-accumulate-eval